Here at Chez Spears, we like alliterative days for things: Meatball Monday, Taco Tuesday…you get the idea. I’ve found that using alliterative days to be a very useful shorthand for streamlining and making menu-planning easier for my family. This handy tool is also useful when it comes to remembering to do an extremely important aquarium task, and so Water-change Wednesdays were born.
Why do water changes?
Fish in the wild generally live in bodies of water much larger than the largest of aquariums, often with strong currents, which helps to dilute or wash away any waste products the fish make. This isn’t so in our much, much smaller glass boxes of water. Fish waste has nowhere to go. Our fish do get some relief from the beneficial bacteria that break down ammonia and nitrite, two chemicals that are very dangerous to fish health. (See: nitrogen cycle). Live plants will take up some of the nitrates the bacteria produce, but high levels of nitrate are also damaging to fish health. Then there are the organic acids that can alter tank pH, and other nasty byproducts of decomposing fish waste that just sit and build up in the tank water. We can alleviate some of these issues by using extra mechanical filtration, various scrubbers and reactors, and chemical filtration in the form of resins and other compounds, all to target and remove specific waste products. One thing all of these methods have in common is that they are expensive!
This is where water changes come in. Changing your tank’s water is the easiest and least expensive way to maintain high water quality. What I mean by a water change isn’t just topping off the tank to refill what’s evaporated, but physically removing some of the old water and replacing it with new. Removing a portion of the water from the aquarium removes the nitrates, the organic acids, and other waste byproducts directly from the aquarium. Replacing that old tank water with new water helps to further dilute any remaining waste products until the next water change. New water also replenishes the essential minerals that fish absorb from the water column, similar to the minerals we ingest from our drinking water. Couple your water changes with gravel cleaning, and you can remove any solid wastes (fish poo, leftover food) that may have collected in the aquarium substrate as well.
How much do I change, and how often?
There are as many opinions on how much water and how often to change that water as there are aquarists. One thing they do agree on is that breaking a tank all the way down to clean it is unnecessary. Doing so not only stresses the fish out when they are removed from the tank, but breaking the tank all the way down destroys the tank’s biofilter, since it kills off all the beneficial bacteria.
In my experience, changing around fifty percent of the water once a week seems to work well (Water-change Wednesdays ring a bell?). The fish stay in the tank throughout the process, and seem to enjoy their freshly cleaned water after I’m done. Replacement water is made up to match the current tank water parameters as closely as possible so as not to shock the fish by any rapid water chemistry changes. Since my fish all tolerate my local tap water parameters, all I really do is make sure I’ve removed any chlorine or chloramine that’s been added by the municipal water treatment plant, and match the temperature of the tanks.
Water change equipment
The basic equipment you need for water changes are: buckets for new water, a bucket for old water, a gravel siphon, and some kind of water conditioner. Your friendly neighborhood aquarium shop, or big box pet store if you don’t have any locally owned shops around you, likely has knowledgeable and friendly staff that will gladly sell you everything you need on this list, and at full retail prices. I’m not saying they’re trying to cheat you, but I will say that water change equipment is one place you can save some money, if you know where to look!
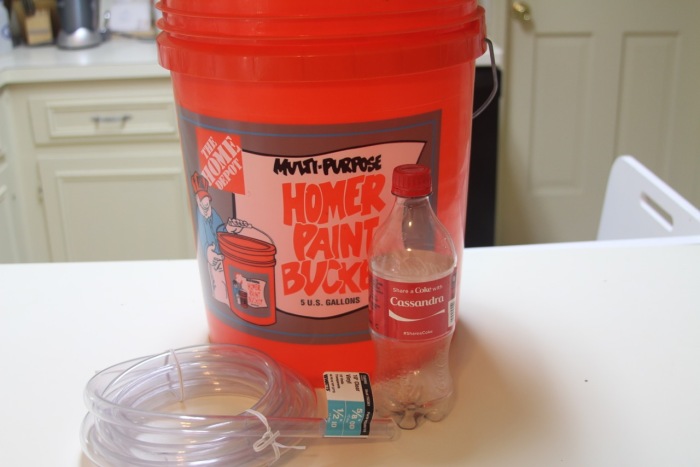
Let’s start with buckets. My local big box pet store has a 3-gallon bucket they sell for around $12. For me to do a 50% water change on my 29-gallon aquarium, I’d need six of these (five for new water, one for old water)! Or, I could go to Home Depot and pick up a good ol’ 5-gallon Homer bucker for $3. Sparing you (and me) the math, that’s a lot of savings!
Water conditioners can be pretty pricey, too. A 16 oz bottle, at the same big box store, of a brand-name water conditioner goes for around $13. The store brand, which is actually made by the same exact name brand manufacturer, goes for $9.99. If your town or city uses only chlorine to treat its tap water, you don’t even need water conditioner. Letting your new water sit for a day or so in your make-up water buckets is long enough to let the chlorine come out of the water on its own. However, chloramine won’t naturally dissolve out of the water, you’ll need a water conditioner to break the chemical bonds between the chorine and ammonia molecules.
Gravel vacuums and water siphons are another area where you can save a lot of money. At the big box store, siphons range from around $8 for your basic vinyl tubing gravel vac, around $15-$25 for vacuums with built-in hand pumps to start the siphon, all the way up to $69 for a very fancy venturi faucet-driven vacuum. There is a DIY option, however, that can save a ton of money, if you don’t mind the old-fashioned way to get your siphon going.
DIY gravel vacuum
This build uses 5/8″ vinyl tubing that you can find at your local hardware store. I found 10 feet of it for a little less than $5. This will form the siphon. The gravel vacuum attachment is a 20 oz. Coke bottle. Start by drilling a hole in the bottle cap slightly smaller than your tubing. I used a 1/2 inch drill bit to make this hole:

Next, insert your tubing into the hole you’ve drilled in the top of the bottle:

Lastly, cut off the bottom of the bottle, and trim the hose so you have about five or six feet of tubing attached to the bottle:

Voila! A homemade, DIY gravel vac, and it really works!
How do I DO a water change?
First, make sure you’ve prepared your new water beforehand. Next, get your gravel vac and old water bucket and head to the aquarium. I recommend bringing along a few towels. They’re good for soaking up any spills, as well as drying off the front of the tank when you’re done. Then, you need to get the siphon started.
I’ve always been partial to starting my gravel vacs the old-fashioned way: sticking the vacuum end in the tank and sucking on the tube end to get a flow going. If you have enough practice, you CAN avoid sucking in a mouthful of old tank water. Another option you can use is submerging the entire tube in the aquarium and filling it with tank water. You can then cap the tube end with your thumb, remove it from the tank, and place it into your old water bucket. Once the flow is going, stick the gravel vac end into the substrate and suck out all the old fish poo and whatever else is lurking down there!

Once you’ve removed as much old tank water as you need to, slowly pour the new water from your make-up buckets into the tank. I use my hand to spread out the new water as it pours in, so as not to disturb any plants’ roots or the substrate. What to do with the old water? Give it to you house plants and container veggies! It’s full of wonderful organic fertilizer that they simply love.
Why we love water changes
Here at Parlour Oceans, we believe that maintaining high water quality on a budget is easy (and best!), and water changes are the way to do it. Keep your fishes’ water fresh and clean, and they’ll reward you with vibrant color, vigorous activity, and long healthy lives.
